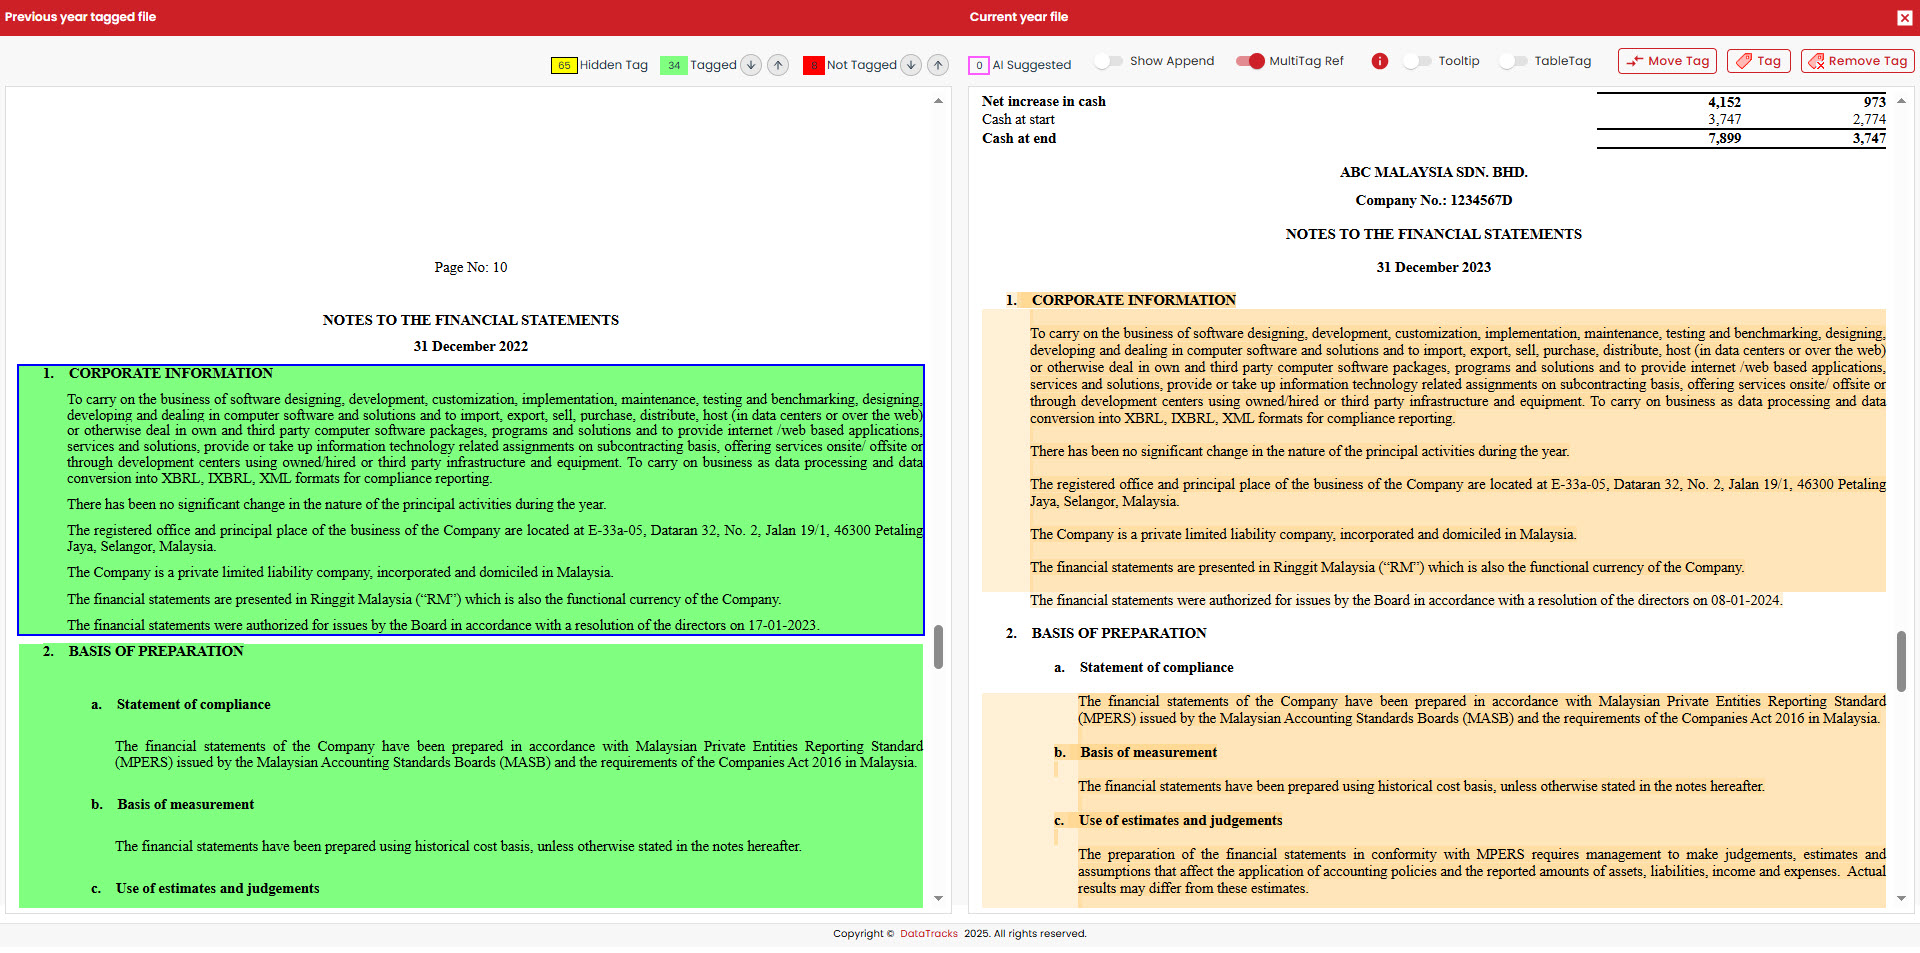
Compare files
The Compare feature helps you review and verify the transfer of tags from the previous year's tagged file to the current year's file after using AI/ML functionality. This feature highlights differences but also ensures you can easily manage tags, whether they’ve been successfully transferred, require manual adjustments, or need to be removed.
In this article, we’ll walk you through how to use the Compare feature effectively, covering key functionalities such as comparing files, manually transferring tags, working with table tags, moving tags within a file, and removing tags that were transferred incorrectly.
1. Click on the "Compare"  icon in the top-right corner of the screen.
2. Once activated, the previous year’s tagged file will appear on the left, while the current year’s file will be displayed on the right.
3. You can click on each element in the previous year's tagged file, and the corresponding element linked to the current file will automatically be highlighted in blue.
4. To make the comparison process easier, the feature uses specific colors to highlight content:
Yellow: Represents hidden tags in the previous file.
Green: Shows tags that have been successfully transferred from the previous to the current file.
Red: Highlights tags that were not transferred successfully and require your attention.
The number of hidden tags, tags that were successfully transferred, and tags that could not be transferred. With this clear visual aid, you can quickly identify which areas need further action.
Transfer tags manually
If any tags have not been automatically transferred, they will be highlighted in red within the previous file. You can easily transfer these tags manually by following the steps below:
1. Identify and select the content highlighted in red in the previous file.
2. Next, Select the corresponding content in the current file also in the previous file
3. Click on the "Tag" icon located at the top-right corner of the screen and tag will be transferred successfully.
 Transfer Table Tags
If tags within tables are not transferred automatically, you can manually transfer them with ease by following the steps below.
1. Ensure the "Table Tag" toggle is switched "ON" before proceeding.
2. Select the table content from the previous file.
3. Identify and select the corresponding table content in the current file.
4. Click on the "Tag" icon to complete the transfer.

Ensure the number of rows or columns you select matches between the two files. If they do not align, the tag transfer will not be successful.
Move Tags within the Current File
You can also transfer tags from one section of the current file to another. Follow the steps below.
1. Select the tagged content that you want to move.
2. Hold down the Ctrl key and then select the destination content where the tags should be transferred.
3. Click on the "Move Tag".
4. The tags will now be transferred to the new location seamlessly.
Multi-Tag Ref
When an element is tagged multiple times, the Multi-Tag Reference feature helps you identify and manage these instances easily. To use this feature:
1. Toggle ON the "Multi-Tag Ref" button.
2. Once enabled, a number will appear above each piece of content, indicating how many times it has been tagged. This feature ensures you can keep track of repeated tags and make any necessary adjustments.
Remove Tags
If any tags have been incorrectly transferred, you can remove them quickly and effortlessly by the steps below.
1. Select the incorrectly tagged content in the current file.
2. Click on the "Remove Tag" icon. The tag will be deleted successfully, leaving your file clean and accurate.
The Compare feature streamlines the process of reviewing and managing tags, offering a user-friendly experience to ensure data accuracy. You’ll be able to identify and resolve discrepancies, transfer tags manually, work with table tags, and remove or move tags as needed. If you have any questions or need further assistance, feel free to reach out to our customer care team at support@datatracks.com.
Related Articles
Tag values of the financial statement
Tagging financial values ensures that the correct numerical data from the financial statement is accurately mapped to the appropriate elements in the template. This structured approach improves compliance and minimises errors in reporting. Follow the ...Tag TextBlock
Tagging a text block ensures that the correct content is assigned to the appropriate element in the template. Follow the steps below to tag a text block efficiently. 1. Navigate to the financial statement and identify the text block that needs to be ...Add or remove footnotes
Footnotes serve as additional information or explanations for specific data points in a document. They help clarify the context of the tagged values, ensuring transparency and accuracy in financial and regulatory reporting. In the XBRL Reporting ...Auto Tag
The application includes an automated feature to analyse and recognise text blocks within a document. This functionality intelligently identifies relevant text blocks and automatically assigns them to the appropriate elements in the template, ...AIML - Roll Forward
The Roll Forward feature streamlines the process of transferring tags from a previous year’s iXBRL document to the current year’s document. This ensures consistency, reduces manual effort, and improves efficiency in the tagging process. Follow the ...
Popular Articles
Sign in to the Rainbow application
You can log in to the Rainbow application with the credentials (registered email address and password) shared by us. To access the login page, use the following URL: rainbow.datatracks.com Enter your registered email address and password. Click on ...Create entity
An "Entity" is a term used to describe a company that's required to create and submit periodic reports to regulatory authorities in iXBRL format. It's important to note that a single firm can have multiple entities under its umbrella. To uniquely ...Create user
A "User" refers to a specifically identified individual who plays a role in preparing, reviewing, and filing documents. Follow the provided steps below to create a user. Admin >> User >> Add >> Submit Hover the mouse over the “Admin” menu at the top ...Edit user
In case you would like to modify the user details, you can change them by following the provided steps below. Admin >> User >> Edit >> Submit. 1. Hover the mouse over the “Admin” menu at the top right of your screen then select "User" to access and ...Create user role
A "user role" is a defined set of permissions and privileges assigned to a user within the application. These roles are created to determine what actions a user can perform, what information they can access, and what functions they can execute within ...
Recent Articles
Add or remove footnotes
Footnotes serve as additional information or explanations for specific data points in a document. They help clarify the context of the tagged values, ensuring transparency and accuracy in financial and regulatory reporting. In the XBRL Reporting ...Add, modify, view and remove footnotes in the repository
The application allows you to add, modify, view, and remove footnotes within the repository. Follow the steps below to efficiently manage footnotes in your template. Right-click on any cell within the template where you want to insert a footnote. ...Enabling Two-Factor Authentication (2FA)
Two-Factor Authentication (2FA) is an additional layer of security that helps protect your account from unauthorized access. When enabled, it requires a second verification step in addition to your password, ensuring that only you can access your ...AIML - Roll Forward
The Roll Forward feature streamlines the process of transferring tags from a previous year’s iXBRL document to the current year’s document. This ensures consistency, reduces manual effort, and improves efficiency in the tagging process. Follow the ...Forgot password
If you have forgotten your password, you can easily reset it by following the steps below. This ensures secure access to your account. 1. On the login page, enter the email address associated with your account. 2. Click on "Reset Password" to ...